The Simple Way to Group & Attach in Design Space
Do you sometimes just want to give up because you are so frustrated by Design Space? Has it been mostly from learning what the group & attach tools are for & when to use them? Well, worries no more! I have a simple way to learn the group & attach tools in Design Space right here!
When I first started learning Design Space, I would get so frustrated too! I would think I had made a mistake in buying a Cricut just because Design Space was not coming to me! I don’t want you feeling that frustrated or giving up, so I will teach you a simple way to learn these tools!
How to Group in Design Space
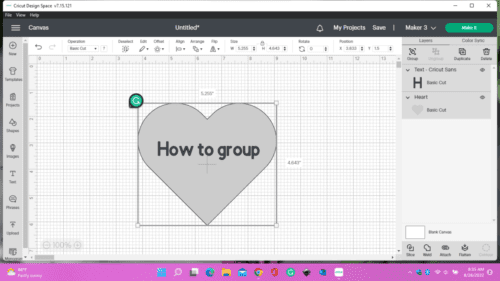
First, let me tell you what ‘group’ is. Grouping allows you to hold layers, images, or text together so you can move or resize these layers all at once, not individually. To ‘group’, you would select the layers (hold down your shift key & select) you want to group & click on ‘group’ in the layers panel on the right. In the pic below, you can see I have some text & a heart shape. I’ve selected both layers on the right & now, I’ll click on ‘group’ at the top.
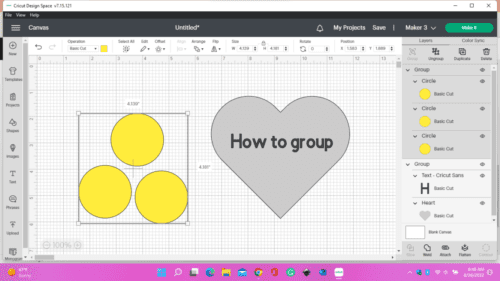
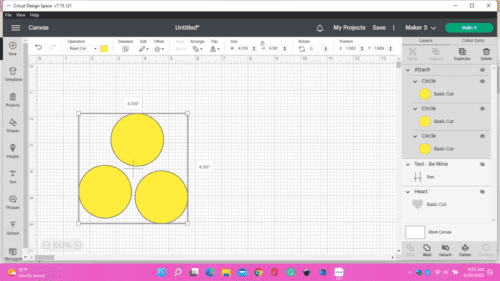
Now I can move them around together so I can resize them. To ungroup, you do the same thing only click on ‘ungroup’ at the top. In the below pic, I’ve added some circle shapes & I want to change the colors to yellow. Instead of clicking on each one & changing each color, I’m going to ‘group’ them first & then change the color to yellow one time. Cool, huh?!
Tip: If you are nervous about using this function, just duplicate the images or text & hide them for the time being. That way, you’ll be able to go back to them if you something doesn’t work out.
How to Attach in Design Space
The ‘attach’ tool actually does two things. First, say you want to write something on your heart shape; you’ll want to select both layers & ‘attach’ them. This tells your Cricut to write the text onto the heart shape.
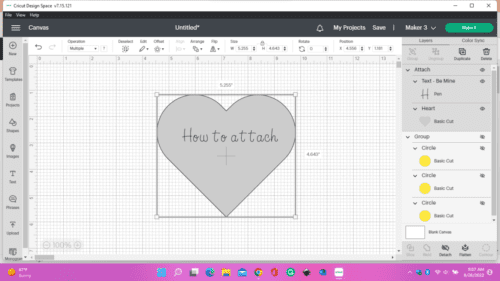
If you didn’t ‘attach’, it would first cut out your heart & then write your text separately. See pic below. To ‘detach’, make sure you’ve selected the right layers & hit ‘detach’ at the bottom.
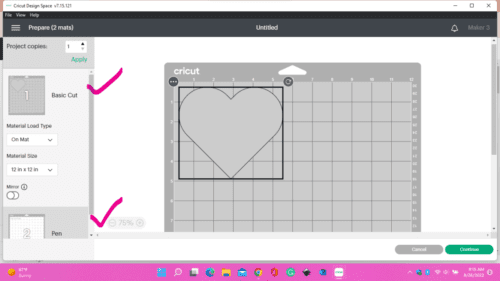
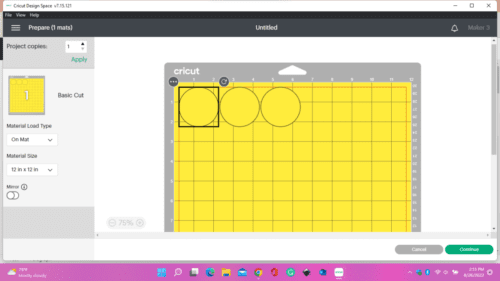
The second thing ‘attach’ is used for is keeping layers together, exactly how they are on your canvas when you go to ‘cut’ your project. See pic below on the left. I’ve got my circles ‘attached’, so the Cricut will cut them together in the same way they look on the canvas. If I didn’t ‘attach’, the second pic is how it would cut out. Your Cricut will cut out your design to save you the most in your materials.
Questions
Sometimes, I’m asked, “Why can’t I attach?” or “How come my attach button is greyed out?”. You have to have at least two layers selected to be able to ‘attach’. Another question I get is, “What’s the difference between ‘weld’ & ‘attach’?”. When you ‘weld’, it unites two or more shapes or layers into one shape or layer. When you ‘attach’, it holds two or more layers in the same place for when you cut, but they still are separate layers.
I hope this post has helped you to understand, in a simple way, the group & attach tools in Design Space. If this post has helped you, please share it on social media, & I would love it if you followed me while you’re there! I would appreciate it so much! If you want to learn more about welding & slicing in Design Space, click here! If you are interested in free SVG’s from my growing digital library, sign up for my newsletter on the About page. I’ll send you the password straight to your inbox! Have a good one!💕