How to Use Cricut Infusible Ink Transfer Sheets
Hi again! I’m so excited today, because I’m going to share with you how to use Cricut Infusible Ink transfer sheets! Many beginners who hear the words “Infusible Ink” either say, “no way – too hard!” or “what?”. After this step-by-step tutorial, you’ll say, “Yes, way – NOT too hard!” or “There are so many things I can make!”
If you haven’t heard of Cricut’s Infusible Ink sheets/pens, let me tell you a little about it. With HTV, you put your design on top of a blank of choice & the adhesive is activated by heat. Now, Infusible Ink activates with very high temps but becomes one with the material. Your materials must be compatible & Cricut has many items just for Infusible Ink. If you want to use generic products, & they’re labeled “sublimation compatible” those will work also. There is no peeling, flaking, wrinkling, or cracking of the design. It’s a great product!
So this post is going to show you how to use Cricut Infusible Ink transfer sheets from design to application. I will be working with my Cricut Maker 3 cutting machine & a couple of compatible mouse pads. Below is your list of materials you’ll need, & then we’ll get into the design.
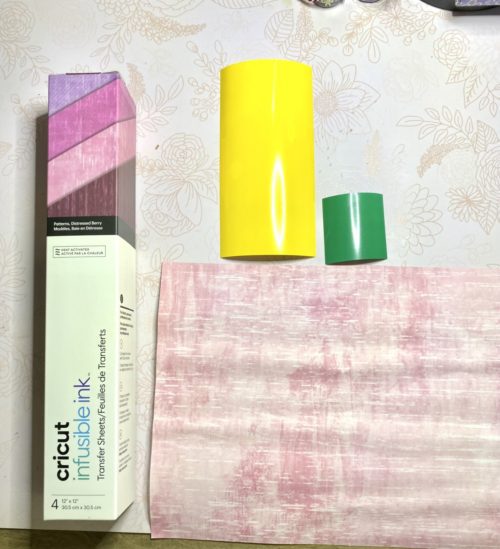
Materials Needed
- Cutting machine (I’m using the Cricut Maker 3.)
- Easy press, Easy Press 2 or Easy Press 3 (regular iron is not recommended)
- Heat Guide (click for guide)
- Fine point blade or premium fine point blade
- Standard grip mat
- Heat mat
- Blank of choice (mine is mouse pads)
- Infusible ink transfer sheet
- White cardstock – (has to be white)
- Butcher paper
- Heat resistant tape
- Tweezers
- Lint roller
- Scissors
Designing with Infusible Ink
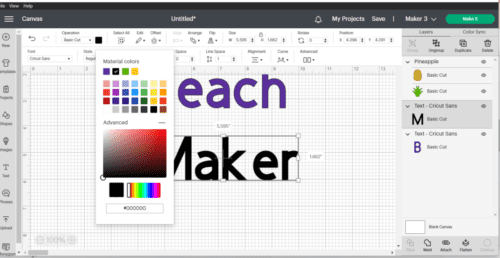
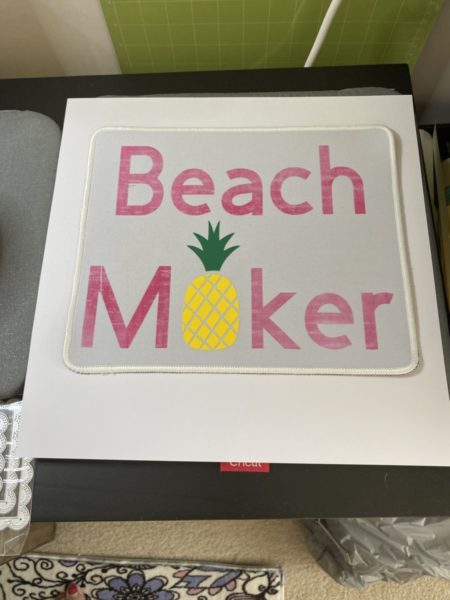
Here we go! Let’s go to the Cricut canvas. I’m going to start by typing “Beach Maker” & then go to “images”, & I’m going to pick out a pineapple. If you want to type something else & search for a different image, that’s perfectly fine. Now, I’m going to change my words to purple.
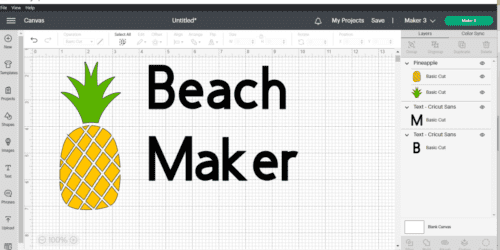
I wanted to show you something on the color menu. Whenever you change colors, you’ll see this menu. The top line of colors are the colors in your design at that time. Do you see how the “maker” word is selected? That color is black & that’s why it has a checkmark. It also shows the green & yellow colors because that is on my canvas (pineapple). Clicking on ‘advanced’ gives you more color options.
Next, I want to size my pineapple down to be able to put it in place of the ‘a’ in ‘maker’. Although, the pineapple isn’t going to fit in between as is. To fit it in between the ‘m’ & ‘k’, go to ‘advanced’ on the top menu & click on ‘ungroup to letters’. Now, I’m able to move the ‘m’ over, delete the ‘a’ & put the ‘pineapple’ in between.

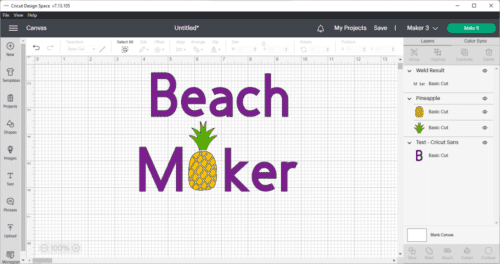
To align the letters & the pineapple, go to the top menu, click on ‘align’ & this time select “align bottom”. Now, we want to ‘weld’ the letters together without the pineapple. Pick just the letters & click on ‘weld’. One more thing, we need to make sure the whole design is correct in size. Measure your blank & then adjust accordingly. Now align the ‘Beach’ & ‘Maker’ by clicking on ‘align’ then ‘center horizontally’.
We want the Cricut to cut out the design just like it looks on the screen. Because we have the pineapple within the letters, we can’t just ‘select all’ & ‘attach’. In the ‘layers’ menu on the right, click only the ‘B’ layer & the ‘M ker’ layer, then click ‘attach’. Now you can actually ‘make it’. You have three different colors, so that’s how many mats you’ll have. So, get your materials ready & we’ll cut out the design.
Cutting of Infusible Ink
I’m back & ready for my cutting. I will use this “Distressed Berry” Infusible Ink sheet for my letters. For the ‘pineapple’, I’m using Cricut & Siser HTV.
Click on “make it” if you haven’t already, and get your HTV ready on your “standard” grip cutting mat. Remember to put the liner side (or shiny side) down & you need to mirror your image. Just a note: if you check the box that says “remember material settings” it will NOT keep the “mirror on” part. You have to click on the mat & it will bring up a box. The bottom left side will have a “mirror” button – slide it to ‘on’.
After you’ve cut your HTV, start cutting out the Infusible Ink transfer sheet. You want that to face UP on your mat (or pretty/colored side up). Then we need to ‘mirror’ the image. For Infusible Ink sheets, I usually use the brayer tool to make sure it sticks down good & doesn’t have any wrinkles in it. (Here’s a tip for a mat that is losing its stickiness. Just turn it around! So you’re putting your material’s top on the bottom right corner. This side doesn’t get much use, so it’s usually more sticky.)
Weeding of Infusible Ink Transfer Sheets
Next, weed your HTV. Get rid of the part you don’t want to be in your design. Now, with the Infusible Ink transfer sheet, that’s different. Don’t use your weeding tool unless you’re trying to get the corner to come up. You can use tweezers to pull out little pieces if needed. You gently roll the design back & forth in your hands to “break up” the pieces & make it easier to get the unused portion out. They call this “cracking”.
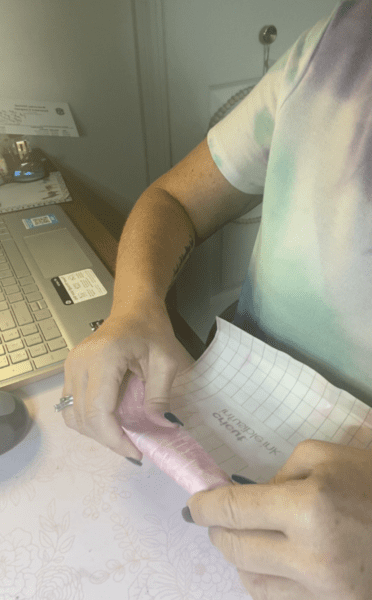
It’s difficult in the beginning, so be patient with yourself. I’m sure as you “crack”, the letters are popping up & it looks like the whole design will come off the liner. I thought the same thing when I first did it. The first design I tried to do was a complicated mandala. I didn’t think about starting with something easier! To say the least, in the beginning, I was not too fond of infusible ink. I kept trying & trying & finally, it began to click & it became easy for me. Now I love it! You will too! Just don’t give up!
Applying Infusible Ink Transfer Sheets
To start, click here to pull up your Cricut Heat Guide. After you get the temperature & time from the guide, you can set up your EasyPress.
Now, place your blank on top of your EasyPress mat. You want to prep your blank if you’re doing a tee, mouse pad, or anything that is fabric. Always run a lint roller over the blank before you do anything else. I promise you don’t want to skip this step. (Shh, I’ve tried before & didn’t have good results!)
Next, take a piece of 12 x 12 white cardstock & put it underneath your blank & on top of the EasyPress mat. If you are doing an apparel item, put another piece inside the blank. This prevents ink from getting a) on your mat & b) on the back of your apparel blank. Now cover your whole blank with the butcher paper. (Butcher paper comes in every box of infusible ink, but you can always purchase more here. You can’t reuse the paper, so you want to keep extra on hand.) After it’s covered, you need to preheat your item, so place your EasyPress on top for approximately 5 seconds using light pressure. (always use two hands) This gets rid of any moisture & wrinkles that might be there. When time is up, remove the EasyPress & the butcher paper & let it cool.
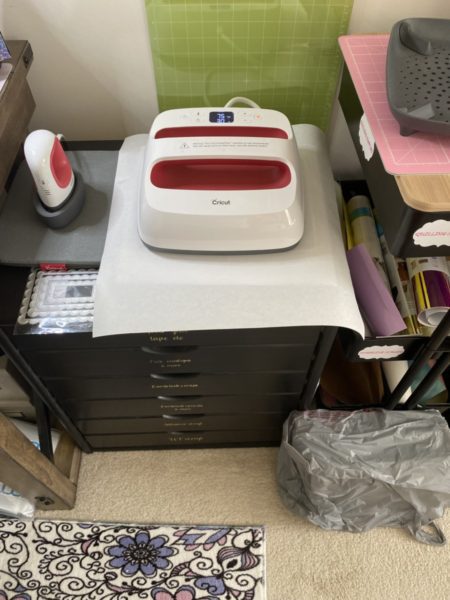
Now, place your design face down (or ink-side down). If your design seems to be slipping around, use the heat-resistant tape & tape it down without covering any of the design. Then cover your design with butcher paper again. (Butcher paper must be larger than your heat mat.) Place your EasyPress onto the “stack”.
It is essential to keep your “stack” as still as possible. Once you hear the beep & time is up, slowly & carefully remove the EasyPress, trying not to move anything below. Let everything cool & then slowly remove the butcher paper & the design.
There you go! That’s pretty easy, huh? You have to remember many different things, but the more you do it, the better you get. After-care, for example, if it was a t-shirt: I don’t wash my tees for a couple of days after being made & I wash them inside out all the time. Tumble dry low or hang dry & don’t use fabric softener.
I hope you’ve learned how to use Cricut Infusible Ink transfer sheets! If you want to learn how to use Cricut Infusible Ink transfer sheets on mugs, see the post here. I would love to hear from you & see how your project went if you followed along! If you found this post helpful, please share it on social media & follow us while you’re there! “redbudsandribbons” If you are interested in my private digital library, sign up for my newsletter here on the homepage & you’ll get access soon after by email. 💕