How to Make Rhinestone Tees
Hello! I’m so excited to give you a step-by-step on how to make rhinestone tees! I am a “bling” kind of girl, so if you are too, this is the tutorial for you! When I first learned how to do these tees, I wanted to make a hundred of them! I haven’t gotten to a hundred yet, but my wardrobe has definitely gotten more sparkly! 😁 Today, we will learn how to make rhinestone tees with “text” templates. I started by learning a hard one, which was a little frustrating & even though it turned out, it wasn’t actually complete. So let’s get into it!
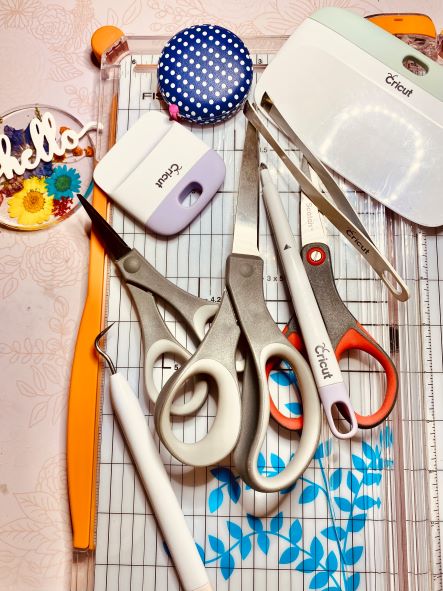
MATERIALS NEEDED
I am using affiliate links which means if you purchase through one of them, Redbuds and Ribbons might earn a small commission, but your price will not be a penny more!
- Cricut (I used the Cricut Maker 3, but you can use any of the Cricut machines.)
- Hot Fix Rhinestones – 1 bag – I chose Light Purple-SS6 (Choose whatever colors &/or sizes you wish – I haven’t made any tees yet with rhinestones bigger than SS12.) Also, if you get a different brand of rhinestones, make sure they are HEAT ACTIVATED – you don’t want the ones you have to glue each rhinestone.)
- Flock material – 1 roll (I would definitely get the roll, instead of the pieces that are already cut to size, in case your template is bigger.)
- Rhinestone Picker Tool
- Tweezers – (The above picker tool has tweezers with it.)
- Tee(s) – You can choose any color or size. I chose a light blue one.
- EasyPress2 – You can use whatever heating tool you use for heat transfer vinyl.
- EasyPress Mat
- Standard Grip Cutting Mat – Green
- Strong Grip Transfer Tape
- Scraper
- Weeding Tool
- Lint Roller
- Sheet Cake Pan – Big enough to hold your Rhinestone template.
- Foam Paint Brush
- Brayer
- Typeable Rhinestone Digital Template Fancy Script Font (You do need to have this font to do the word templates. If you are interested, get this before you start in DS.) I think it was like $8.00. If you are not sure how to download a font see my post “How to Download Free Fonts in Cricut Design Space”. The only difference is after you unzip the file & click on folder, you want to “install” the “ttf” file instead of “otf” that’s in that post.
Rhinestone Sizing
You’ll need these sizes for Cricut Design Space:
- SS6 = 0.102
- SS8 = 0.118
- SS10 = 0.13
- SS12 = 0.146
- SS16 = 0.177
- SS20 = 0.21
How to Make Rhinestone Tees Templates
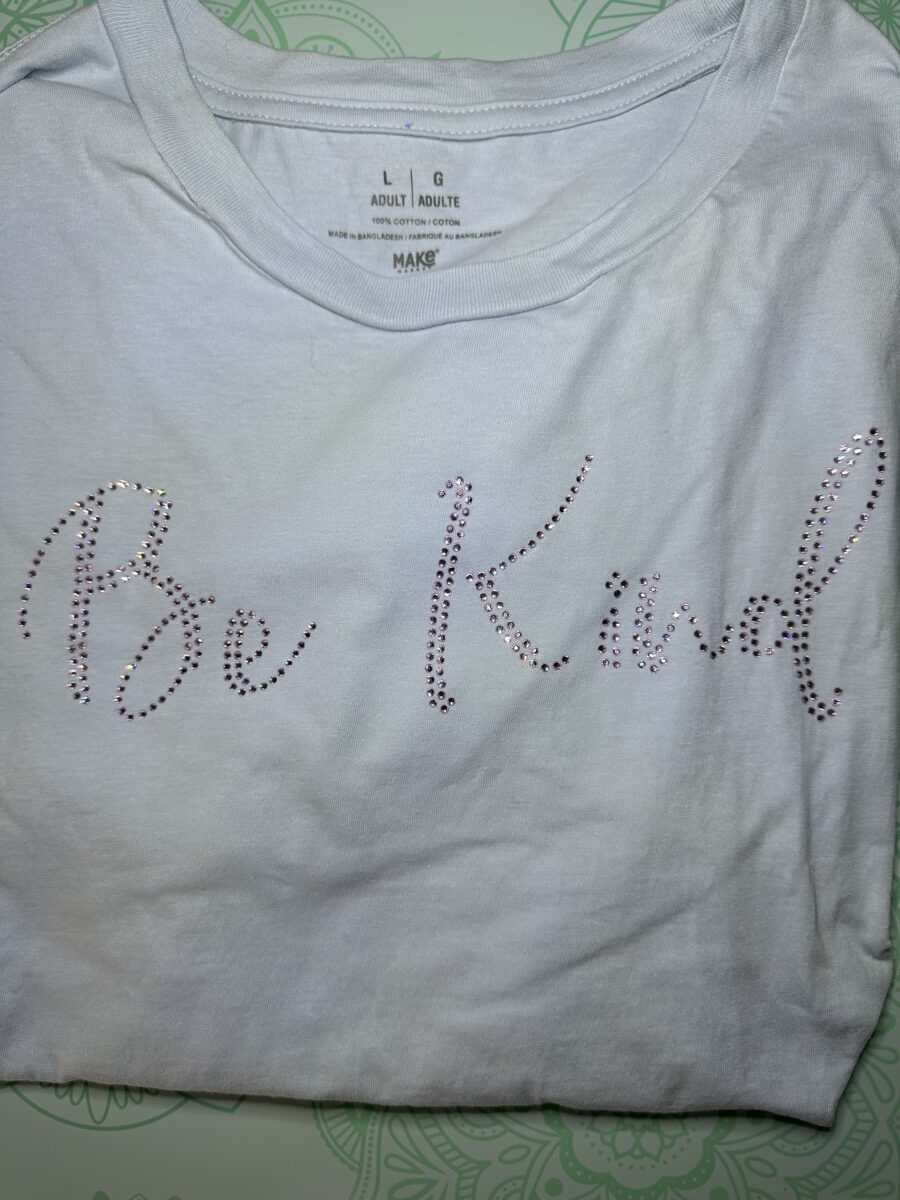
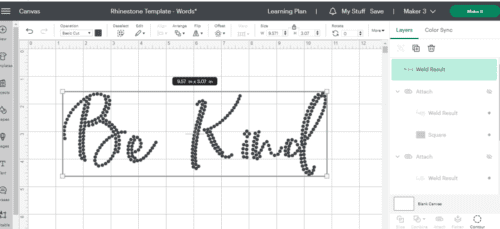
Starting in Cricut Design Space (DS), click on the icon that says “text” on the left toolbar, type a word or two that you would like on your tee. On this tee I wrote “Be Kind”, but it’s up to you.
After you type your words, & with it selected, go to the drop-down menu on the font toolbar that most likely says “Cricut Sans”. Under the tab “system”, look for your new font, which will be under the name “RS01-AW-Cursiva”. Now your wording should look like a bunch of little circles.
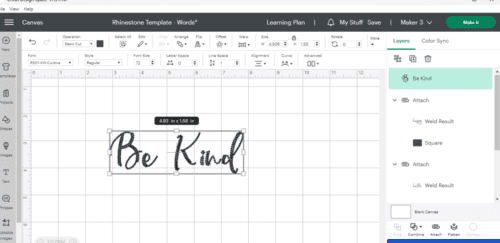
With the wording selected, click on the “Combine” menu then click “Weld”. After welding, select the wording again & this time you’re going to click on “Contour” in the right toolbar. When the screen is coming up, at the bottom it will either say “show all contours” or “hide all contours”, this time you’re going to want to click on “hide all contours” then click the X at the top. This will leave you with one little circle on the screen. (On my screen, it takes a little while to actually show up, so if you’re thinking it’s not working give it a minute.)
Next, with the circle selected, we’re going to change the size of it. Make sure the lock icon is closed. You want to change the size of the circle to whatever size your rhinestones are. I’m going to be using the SS6 rhinestones so my size is going to be 0.102.
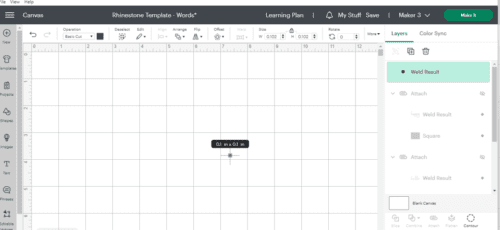
Now, with the circle selected, click on “contour” again. This time we want to click on “show all contours” then click the X at the top. Now, all the circles are the right size for your template.
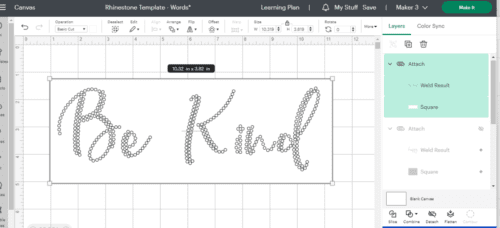
Last thing, you need to go to “shapes” & grab a rectangle. Drag the corner to make it large enough to cover the wording. Click “arrange” at the top & click “center”. Then with the rectangle & the wording selected, click “attach”. Now you’re ready to cut your template.
How to Prepare for Your Rhinestone Templates
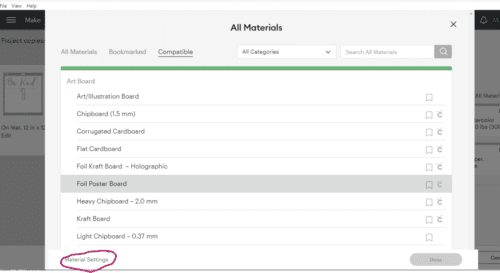
We have our template ready to cut, so let’s click on “Make It”. The first screen that comes up just click “continue”. To be able to cut our your template (flock), we need to set up our material first. So once you get to the Make screen, like in the pic below, click on “Browse all materials”.
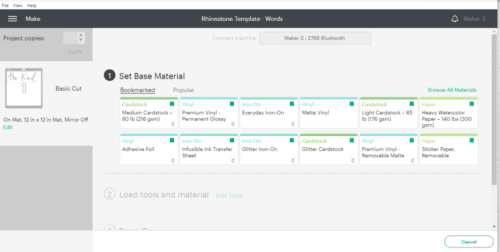
On the next screen that comes up (like pic below), look all the way at the bottom & you’ll see “Materials Settings”. Click on that.
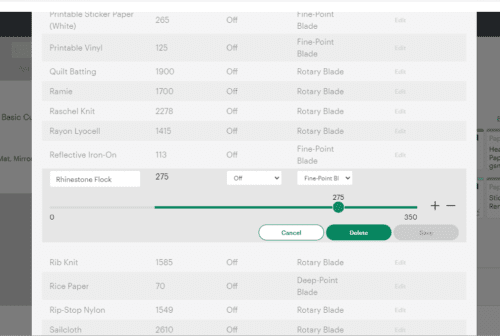
Now on the materials screen, scroll all the way to the bottom & click on “Add New Material”. Under “new material” type in “Rhinestone Flock” & click “save” (don’t hit “done” yet). Now, scroll up to “rhinestone flock” & click on “edit”. Here, we are going to use the slider & move it up to “275”. Leave the multi-blade “off” & the blade type “fine-point blade”, as is, then click “save” & scroll up & “x” out of it. Click on “Browse Materials” then in the search bar, type “rhinestone flock” again & it should pull it up. Click on it then click “done”. Under “pressure” click “more” & you are officially ready to cut! Note: There are different thicknesses of flock. If you’re using the same materials I am, then these are the right settings. If you use different materials, you can use the settings that come with the material.
How to Cut your Rhinestone Templates
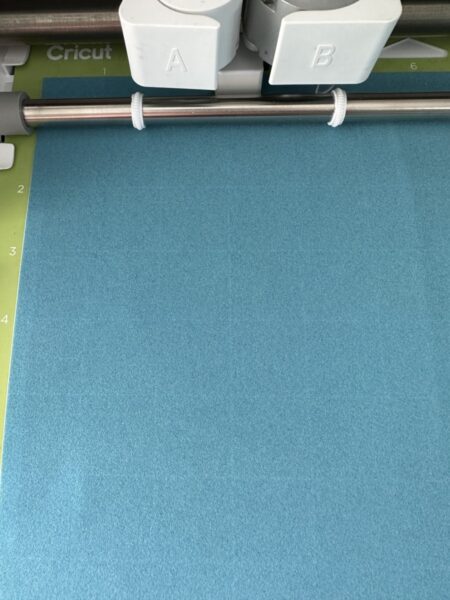
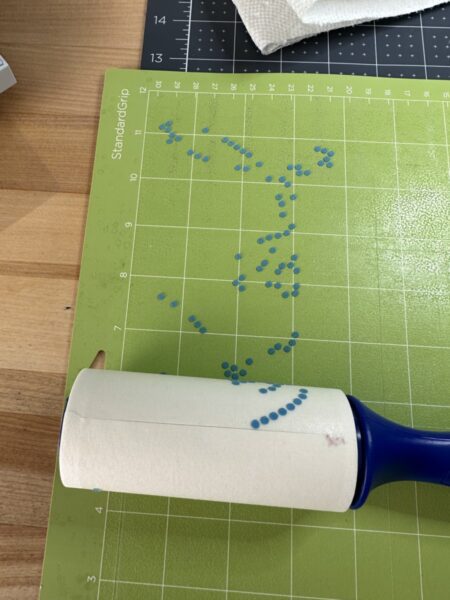
You will need your green “standard” cutting mat. Cut your flock material to the correct size (it will show the size on your “Make It” screen). Remove the backer of the flock, but keep it somewhere close because you’ll use it again. Lay the flock, sticky side down onto the green “standard” cutting mat. I used a brayer to make sure it adheres well. Load it into your Cricut & let it cut. (When I first saw my Cricut cutting I didn’t think it was doing anything so unloaded it & tried to “fix” my blade. Well, nothing was wrong with the blade. It was cutting all along, it just doesn’t show well on the front-side!)
Before you unload your mat all the way, lift up a corner of the flock & make sure it cut all the way through.
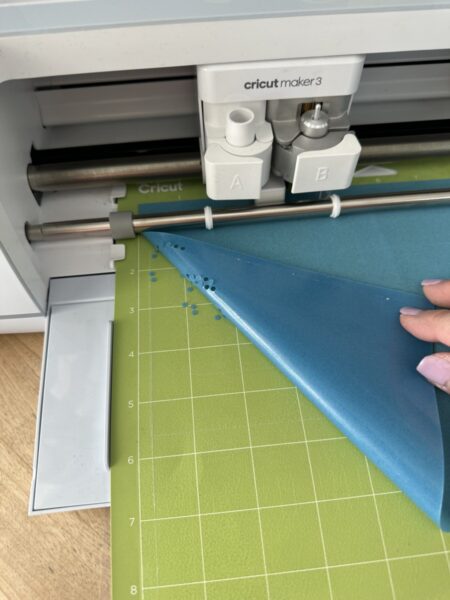
When it’s finished cutting, unload & flip your mat over to pull the flock off your mat.

Either use your scraper tool or you lint roller (I liked the lint roller better) to clean your cutting mat.
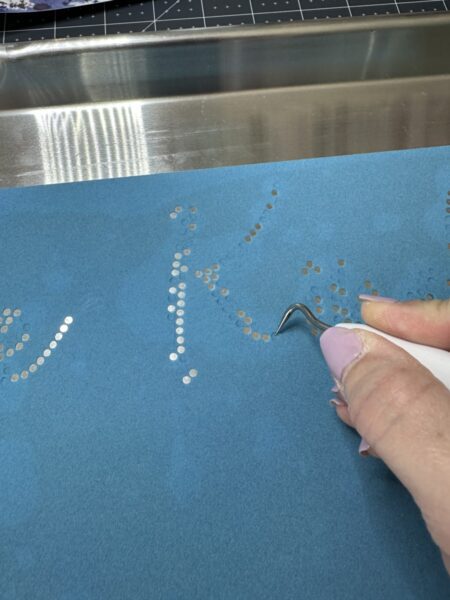
Now you’re going to weed your flock template. You can put the flock onto the backer or onto the sheet pan & weed.
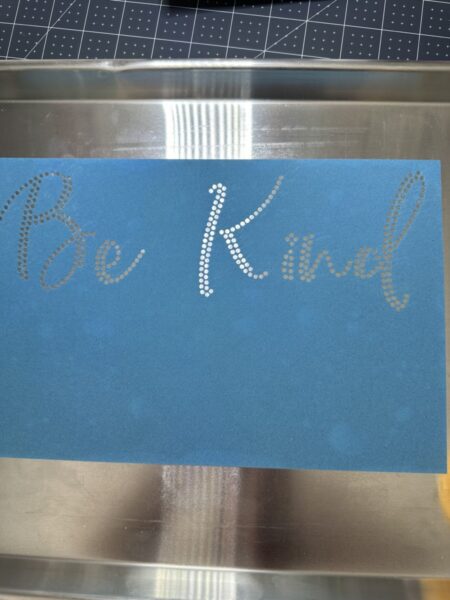
Now we’re ready for the rhinestones. Pour out some of the rhinestones right in the middle.
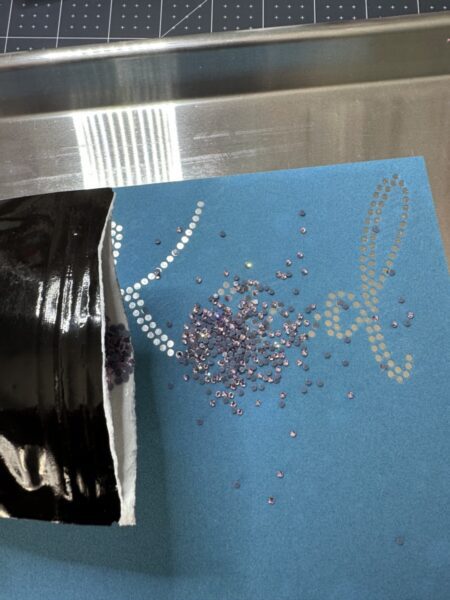
We’re going to take our foam brush & gently move the rhinestones around the holes. I’m using a sponge here, but the foam brush worked much better.
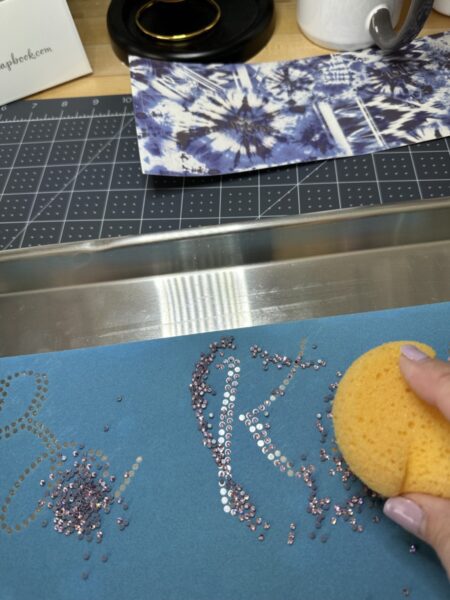
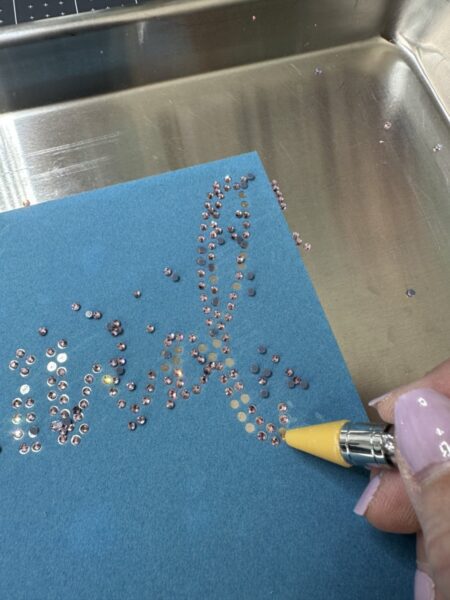
Some of the rhinestones will go in the holes right side up & all. Use your rhinestone picker tool to pick up the remaining rhinestones & put them in the empty holes.
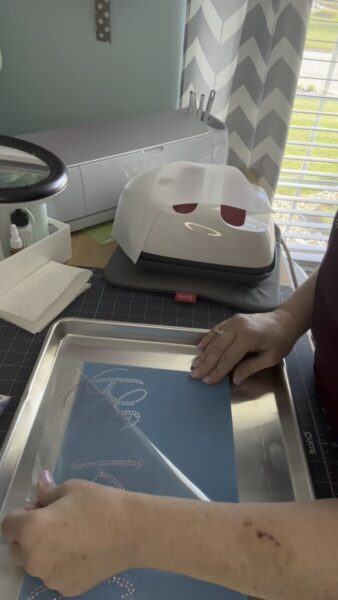
Once you’re done filling the holes, you’re going to get your transfer tape. Peel off the backing & set aside for later. They are reusable.
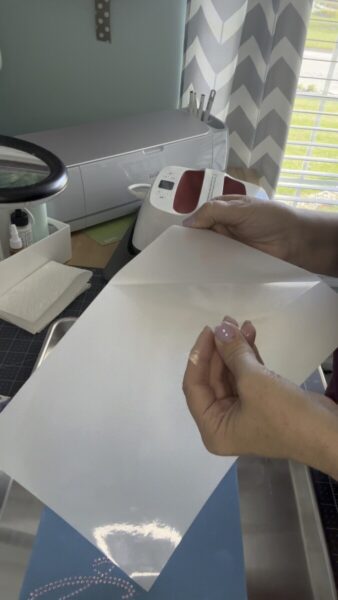
Hold the transfer tape over the middle of the rhinestone template in a U shape. Slowly lay tape down starting in the middle.
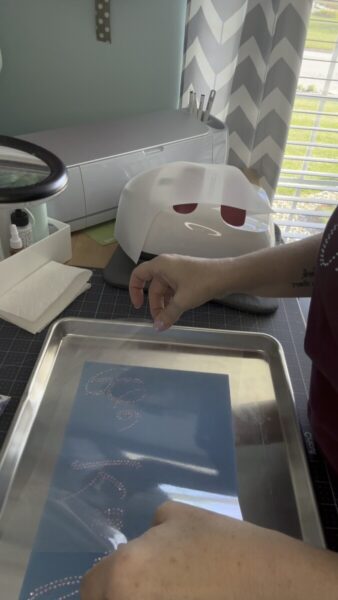
Once you have the transfer tape on, gently touch each rhinestone to make sure it attaches itself to the transfer tape.

Now, we are going to slowly & gently peel up the transfer tape with the rhinestones attached. If a rhinestone is a little stubborn & doesn’t stick, slowly lower the tape back down & push on it from the outside.
If you are not ready to lay it onto your shirt just put it back onto the backing until you’re ready for it.
How to Apply the Rhinestone Template to Your Tee
Once you have your shirt ready, you are going to want to use your lint roller & go over the front of your shirt. Don’t miss this step. (I tried once to skip it when I was doing HTV, because I didn’t think it was a big deal, & I won’t do that again. All sorts of lint was stuck into the vinyl!)
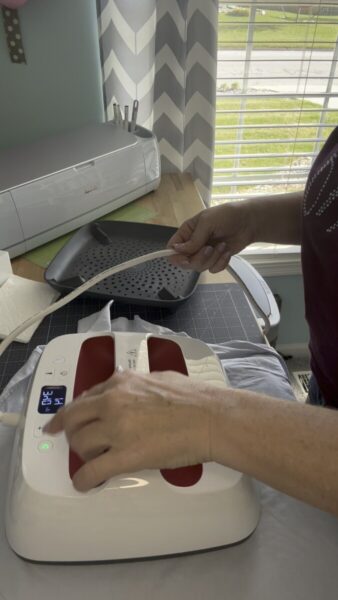
Anyways, now you want to find the middle of your shirt by folding it half & lining up all the seams. Next, you grab right under the underarm area & fold over. Then use your easy press for about 10 secs. & press right on the folds. This will not only give you the middle of the shirt vertically, but horizontally you’ll have a straight line. Tip: I would put butcher paper on the inside of the shirt, just to make sure none of the glue goes through to the back side while pressing.
Next, set your EasyPress (whichever one you have – if you don’t have one, just use an iron.) to 340 degrees & 15 seconds. We will press 15 secs. on the front & 10 sec. on the back of the shirt.
I had to press mine in two sections because I have the smaller EasyPress 2 (9×9). So I did both my sections on the front & then went to the back & did 10 secs.
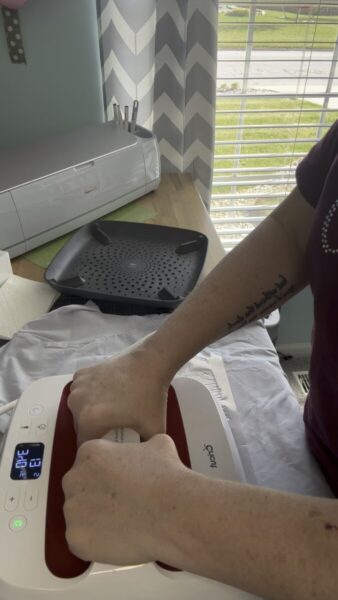
Once it’s completely cool, you can slowly & gently pull up on the tape at an angle until it’s removed.
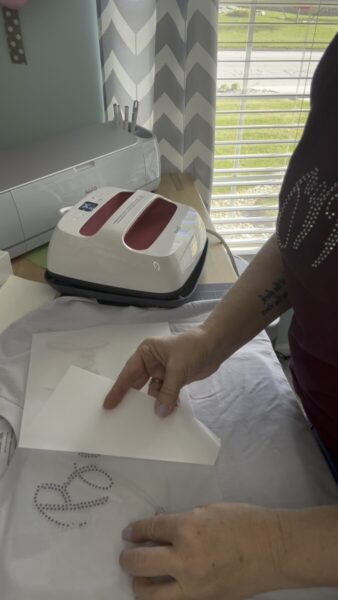
Once that’s off, press right on top of the rhinestones for 10 secs. (I had to do mine in two sections again.)
Clean Up of the Rhinestones & Supplies
Just a quick note…the remaining rhinestones in your tray or baking sheet, can be poured right back into the bag. The flock template is reusable so I’d put the backing on it & save it for next time. Remember, the transfer tape is also reusable so you could put the backing back onto that.
Summary
I hope you enjoyed this post on “How to Make Rhinestone Tees”. I thought it was a fun one to share! I’ve made a total of 4 or 5 shirts already & plan to make many more. I just love the bling it adds to a simple tee & think it’ll make great gifts. If you liked this post, please share on social media & I would love it if you followed me while you were there! I would appreciate it so much! If you are interested in my new “Complete Font Guide – How to Work With Fonts in Cricut Design Space” there are a couple places on my home page that you can sign up for it. Have a good one! 💕 .