How to Make Labels With Your Cricut
I’m so excited to show you how to make labels with your Cricut 3 different ways! You can make labels for your pantry, for crafting supplies, for bottles or jars, etc. My first experiment with labels when I got my Cricut was sticker labels with writing (& not even a ‘writing’ font!). Then I realized there are so many ways to make labels! I’m not going to show you ALL the ways, but I am going to show you 3 ways. Just recently, I did a vinyl project with labels to redo my crafting drawers with adhesive foil, see here. I won’t go over that one again, but you can take a look at that post & then you’ll know 4 different ways. Let’s start…..
1st Way to Make Labels – Sticker Paper & Writing
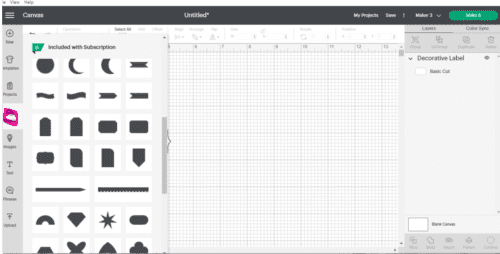
First you want to start a new design on your canvas. For this part, you can do it 2 different ways; you can either pick a shape from the shapes icon or go to the images icon & type in ‘labels’ in the search bar & pick out a design for your label. If you are in ‘images’ when you find one just ‘add to canvas’. I usually change the color of my labels to white, because that’s what color my sticker paper is but it’s up to you. Make sure to measure your labels to whatever size you need. Then I would click ‘duplicate’ on the right panel as many times as you need labels.
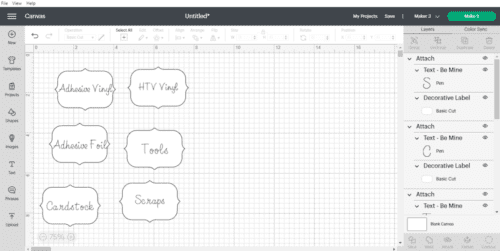
Now you want to pick out a “writing” font. Hit the ‘text’ icon on left panel & type in your wording for your first label. Then go to top & click on ‘font’. That brings up a list of fonts, but you want to use the ‘filter’ & check the ‘writing’ box. It’s important to choose a writing font if you want the words to look whole. If you picked any kind of font that wasn’t ‘writing’ you would get an outline of the wording. (A couple of fonts I like for print is “Be Mine” & “Brandon” & for cursive I like “Alyssa Stencil Script” & “Haley” but there are many choices).
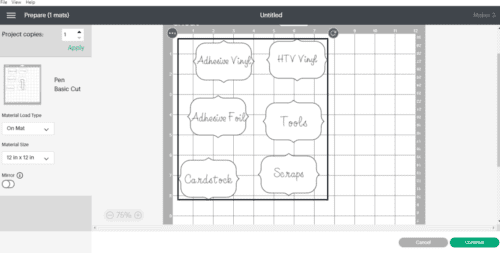
Here is the time to change your color of pen from black to whatever you choose or leave as black. Change your ‘cut’ operation to ‘pen’ & it will show you on the right panel if it’s changed. You’ll want to center the wording onto the label so click on the wording & the label shape at the same time by holding down your shift button & go to align. While they are both still selected, click attach. You do this for each label you want. At the very end, if you want your labels to come out as you see on your screen, click the ‘select all’ at top & click ‘attach’ again. This keeps the labels right where they are as you’re looking at them on the screen. Click ‘Make It’ & browse for “printable sticker paper – white”. Load your pen & your mat into your Cricut & that’s it.
2nd Way to Make Labels – Adhesive Vinyl
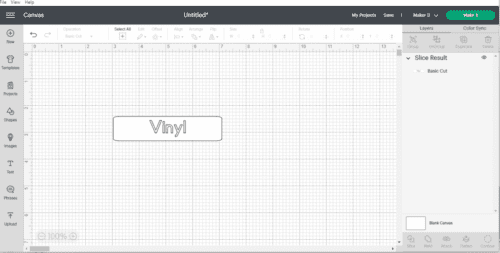
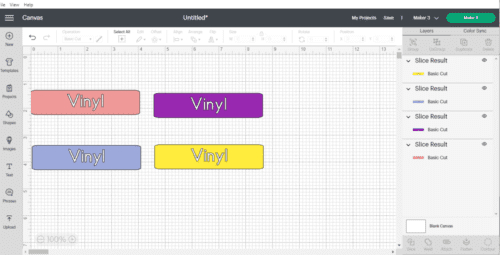
Here you’ll use some of the same methods as above. First, let’s grab a rectangle out of shapes. Measure the size you want. Type in your first label’s words & pick your font & align. After getting everything set & where you want it then use the ‘slice’ tool. Pull out the pieces you don’t want & delete them. Now you’re left with a label with the word(s) cut out like in the first pic below. Continue doing this for how many labels you need. Hit your “select all” button & ‘attach’ then click on ‘Make It’. Add your vinyl to your mat. Just remember once it’s cut out you will see through the letters. So whatever color you’re putting it on will show through. You could have something like a crafting cart that has rainbow colored drawers & use a white vinyl so all the colors show through. Or you could use different colors of vinyl & put it on something that’s one color. So many options!
3rd Way to Make Labels – Print Then Cut
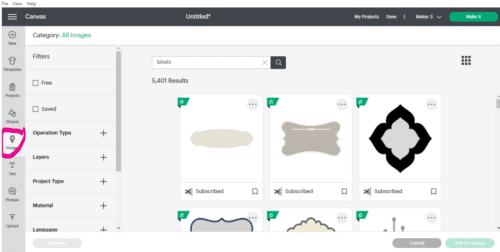
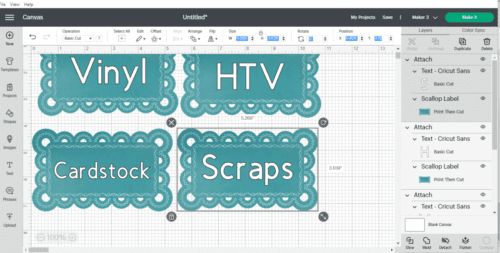
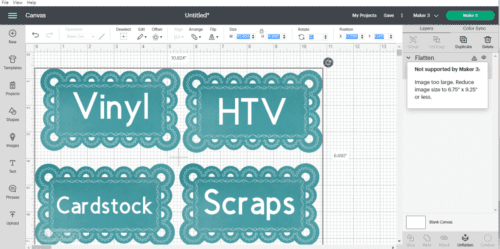
The Print Then Cut option Cricut gives us is amazing! Do a new canvas & this time we’re going to go to the ‘images’ icon on left then type in ‘labels’ at search. Now I’d like you to click on “operation type” on left then click on “print then cut”. Look at all the pretty options we have!! After you pick one & add to canvas you’re going to size it, duplicate it, type your wording, pick your font & font color then align & with both layers selected you attach. Do this for each label. When everything is set do ‘select all’ & use your ‘flatten’ tool at the bottom right panel. The flatten tool takes all the different layers & makes it into one cuttable layer. In my first pic below you’ll see I’ve selected “all” then in the next pic you’ll see I got a ‘warning’ that says basically my stuff is too big. You can’t go any bigger than 6.75″ x 9.25″. So what I did was ‘select all’ & downsized all of it to just under those measurements.
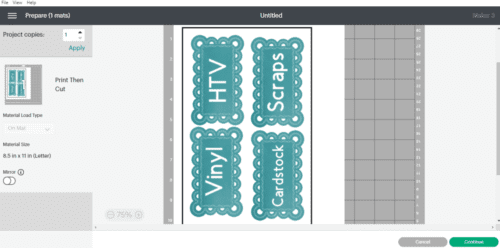
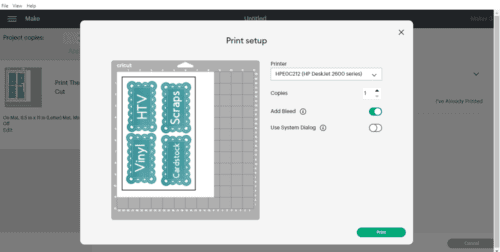
Now you’re ready to ‘Make It’. This is where it’s a little different. You’re going to put your cardstock paper into your regular at-home printer. It’s going to print out these labels & it will have a big black outline on it. This is correct. I remember when I first tried & I thought I did something wrong once I saw that mark. Now you select the ‘send to printer’ & when the printer dialog comes up we’re going to change a couple things. You want the ‘bleed’ & ‘user dialog” both on. That will bring up another screen… you want to go to “preferences” & choose “matte brochure or professional paper’ if you’re using cardstock. Next you want to click on “print quality” & select “Best” then click ok & print. Once that is done you’re going to put the cardstock on a mat & load it into your Cricut. The Cricut will read it’s registration marks & cut out each label where it’s supposed to. Amazing huh?!
I hope this was fun for you to make some new labels & that you tried them all. With all the different ways to make labels with your Cricut, I hope you found at least one that you really liked. I love the Print Then Cut option, because you can really get some colorful pretty labels. Let me know if you have any questions! 💕