How to Download Free Fonts to Cricut Design Space
Hi there! Today, I wanted to teach you how to download free fonts to Cricut Design Space. They could be paid for fonts too, but whether they are free or paid, we’ll learn how. 😁 It’s nice to use Cricut’s fonts or even the fonts you get with Cricut Access, but sometimes it’s fun searching for your own fonts. You might have a project in mind & you want to find just the right font.
I do have to point out, when we say, “download fonts to Cricut Design Space,” it’s kind of misleading. We will download them to your computer & then you’ll be able to access them from Cricut Design Space. Downloading fonts to your computer is a lot easier than you might think! I’ll walk you through how to download free fonts to Cricut Design Space & then summarize it in just a few steps.
First, I’d like to tell you a few places I go when looking for fonts. I use DaFont.com, Fontbundles.com (with Designbundles.com), Creativefabrica.com, and Creativemarket.com. All these places have free & paid fonts except for Creative Market, where I can’t find any free fonts.
So let’s get to it…
First, open up your browser, & for this example, I’m going to Creative Fabrica. Now pull down the menu that says “freebies” on the right side (see below). Then click on “free fonts”. (Tip: ALWAYS look for the license of a font. For these free fonts, on this site, it says at the top that they can be used for “commercial use”. Some will say “personal use” only. It just depends on what & where you were planning on using the font. If you want to sell your products then you need a commercial license.)

For this exercise, I’m picking the font “mylove”. Next click on the green bar that says “download”.

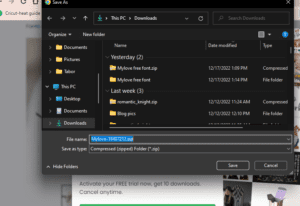
After clicking download, your file explorer (I’m on Windows) should appear. It will be a zip file. Name the file & save it, but remember where the file is.
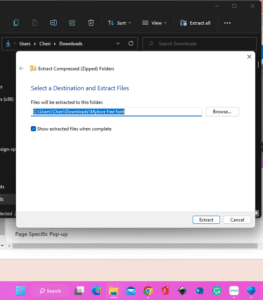
Go back to that saved file. You want to right click on it. Scroll down till you see “extract files” & click. Now a box will come up telling you the name of where the file is going to after it extracts the files. If it’s not ok, change the name, then click extract.
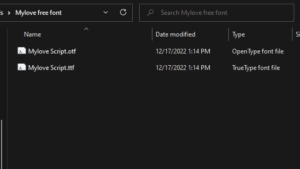
Now go to the file folder (not the zipped file) that was saved & open. The pic below is what it should look like now. When you have a choice between the two; otf or open type font & the ttf or true type font, choose the otf or opentype font. This way, if it has glyphs or special characters you’ll be able to use them. So double-click on the otf file.
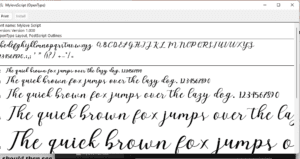
You should then see the screen below. Click on ‘install’ at the top.
Now, the font file is uploaded & installed on your computer. Go to Cricut Design Space & check if it shows up there. If you were already in Design Space, then click “reload” at the top under “view”. Make sure you are looking for the font name under the “system” tab. That tab is for all fonts that are loaded & installed on your computer. Now we have the option to “bookmark” any fonts you want or use all the time – such a nice feature.

So all those detailed instructions might feel a little overwhelming so here it is in a more simplified four step process.
- Download your font onto your computer.
- Extract all from the zip file.
- Install your font onto your computer.
- Then check in Cricut Design Space by clicking on the text tool.
So I hope these instructions on “how to download free fonts to Cricut Design Space” were of help & you now feel like you can look for your own fonts all you want. If you want to learn more about uploading images, see my post “How to Upload an Image to Cricut Design Space” here.